For all my new sites, I'm using free OpenShift account. But it is not 100% stable. Now, I have 5 sites located on OpenShift, and at least once a week, I need to restart one of them (usually it's error 503). So, when number of visitors on sevennet.org exceeded 4000 per day I have decided to move this wordpress blog to my VPS.
Here is a small instruction how to do that
Prepare your VPS\VDS
On your VPS you should have nginx\apache with php and mysql installed.
I would recommend you to change apache to nginx. And here is proper wordpress site configuration for nginx
Generate ssh key to access your OpenShift application
I have made small note: how to generate ssh key and access OpenShift account with this key
Backup your database
- Go to your wordpress administration panel
- Select Tools
- Go to Export
- Select All Content and press Download export file
Save and download all site files and database dump from OpenShift
- Check how to connect to OpenShift application with putty
- Create temporary folder:
mkdir php/temp - Dump database with following command:
mysqldump -u$OPENSHIFT_MYSQL_DB_USERNAME -h$OPENSHIFT_MYSQL_DB_HOST -p$OPENSHIFT_MYSQL_DB_PASSWORD $OPENSHIFT_APP_NAME > php/temp/database.sql - Archive site file structure:
tar -chvzf php/temp/www.tar.gz app-root/data/current - If mysql dump is to big - archive it:
tar -cvzf php/temp/sql.tar.gz php/temp/database.sql
Connect to OpenShift with FTP client and download all backups
I will use WinSCP to do that.
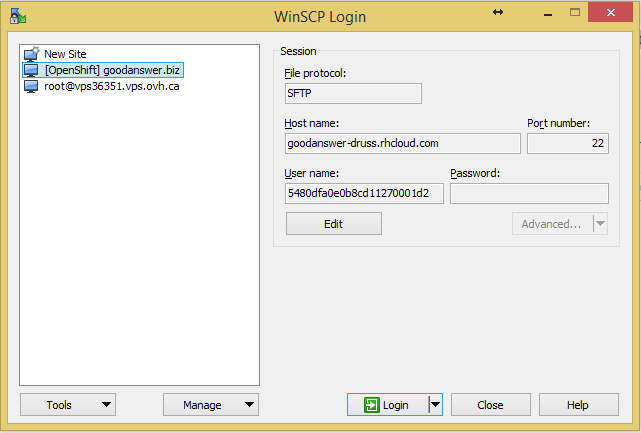
- Open WinSCP and fill address and username information (you can find in on your OpenShift application's page)
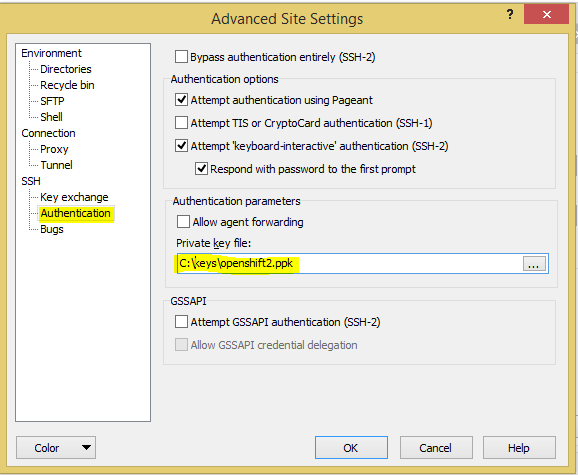
- Go to Advanced... -> Advanced and specify your ssh key there:
- Save and connect to your server.
- Go to "php/temp"
- Download www.tar.gz and sql.tar.gz on your computer
Create and deploy database on VPS
- Connect to your VPS\VDS with WinSCP
- Upload sql.tar.gz
- Connect to VPS via ssh
- Extract sql.tar.gz
tar -xvf sql.tar.gz - Create database and user for wordpress site (replace all CAPS with actual values):
mysql -u ROOT_DB_USER -pROOT_DB_USER_PASSWORD -e "create database NEW_DB_NAME; grant all privileges on NEW_DB_NAME.* to NEW_DB_USER@localhost identified by 'NEW_DB_USER_PASSWORD'" - Restore database content from dump file (replace all CAPS with actual values):
mysql -u NEW_DB_USER -pNEW_DB_USER_PASSWORD NEW_DB_NAME < php/temp/database.sql
Modify Wordpress configs
On your local computer extract files from www.tar.gz
- Open \www\app-root\data\current\wp-config.php for edit
- Replace
// ** MySQL settings - You can get this info from your web host ** //
/** The name of the database for WordPress */
define('DB_NAME', getenv('OPENSHIFT_APP_NAME'));

/** MySQL database username */
define('DB_USER', getenv('OPENSHIFT_MYSQL_DB_USERNAME'));

/** MySQL database password */
define('DB_PASSWORD', getenv('OPENSHIFT_MYSQL_DB_PASSWORD'));

/** MySQL hostname */
define('DB_HOST', getenv('OPENSHIFT_MYSQL_DB_HOST') . ':' . getenv('OPENSHIFT_MYSQL_DB_PORT'));
with
// ** MySQL settings - You can get this info from your web host ** // /** The name of the database for WordPress */ define('DB_NAME', 'NEW_DB_NAME'); /** MySQL database username */ define('DB_USER', 'NEW_DB_USER'); /** MySQL database password */ define('DB_PASSWORD', 'NEW_DB_USER_PASSWORD'); /** MySQL hostname */ define('DB_HOST', '127.0.0.1:3306'); - Delete whole block from "/**#@+" line till "/**#@-*/"
- Go to https://api.wordpress.org/secret-key/1.1/salt/
- Copy and past that text instead of deleted block
- If you don't use ssl connection then delete "define('FORCE_SSL_ADMIN', true);" line
- Also delete following lines:
/** Tell WordPress where the plugins directory really is */ if ( !defined('WP_PLUGIN_DIR') && is_link(ABSPATH . '/wp-content/plugins') ) define('WP_PLUGIN_DIR', realpath(ABSPATH . '/wp-content/plugins')); - Save file
- Archive www folder again (for windows you can use 7zip)
Deploy files to the VPS
- Upload www.tar on VPS
- Connect to VPS via ssh (putty)
- Extract files
tar -xvf www.tar - Copy files to web server site root directory:
cp -a www/app-root/data/current/* /var/yoursite.com/www - Reload web server
Update MX record on your NS server
Change your domain MX record, so it will point to the new VPS server instead of old OpenShift application

